Zero-to-Acumos (z2a) Installation Guide
NOTE: Document is in development.NOTE: Subject to change.
Overview
This installation guide describes how to deploy Acumos using Zero-to-Acumos (z2a). z2a was designed for those who require a simple and automated way to deploy Acumos.
Zero-to-Acumos (z2a) is a collection of shell scripts that have been assembled to perform a simple set of tasks: installation and (where possible) configuration of the Acumos component(s).
z2a is composed of two (2) distinct process flows; Flow-1 and Flow-2. In each flow scenario, installation of additional Acumos plugins is optional as a follow-on procedure.
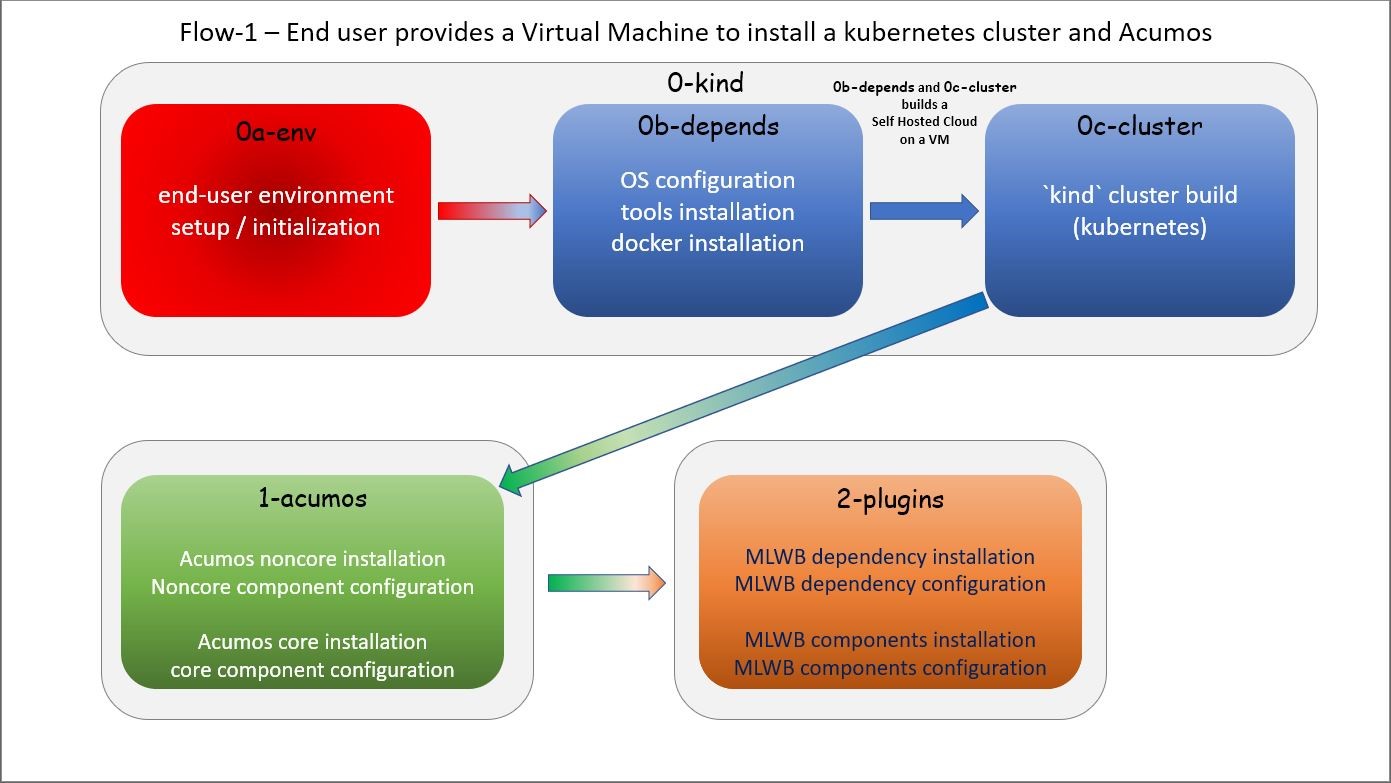
What is z2a Flow-1?
z2a Flow-1 (default) performs an Acumos installation including:
- end-user environment creation;
- VM Operating System preparation;
- z2a dependency installation;
- Kubernetes cluster creation; and,
- deployment of Acumos noncore and core components on a single VM.
z2a Flow-1 is the original z2a process flow targeting development/test environments where a Kubernetes cluster is built and Acumos is installed from scratch on a single VM.
Flow-1 VM Requirements
At the time of this writing, the Operating System installed on the VM must be either RedHat/CentOS (v7 or greater, v8 recommended) or Ubuntu (18.04 or greater, 20.04 recommended).
NOTE: earlier versions of RedHat/CentOS (v6) or Ubuntu (16.04) may be sufficient to run the z2a installation, but they have not been tested.
- Flow-1 VM Resource Sizing Recommendations
- four (4) vCPU (minimum)
- 32GB of memory (minimum)
- 80GB disk space (minimum) (~100GB+ for MLWB and other plugins)
- additional disk space for models (based on developer requirements)
- VM Distribution Recommendations
- git (source code tool)
- git is not installed by default by Linux distributions
- git must be installed to allow for Acumos repository replication
- jq (JSON processing tool)
- yq (YAML processing tool)
Flow-1 Components
Flow-1 consists of three (3) steps using the following scripts (and descriptions):
- Steps 0[a-c]
z2a/0-kind/0a-env.sh # z2a environment creationz2a/0-kind/0b-depends.sh # dependency installation and setupz2a/0-kind/0a-cluster.sh # Kubernetes ('kind') cluster creation
- Step 1
z2a/1-acumos/1-acumos.sh # Acumos noncore and core component installation & configuration
- Step 2 (optional)
z2a/2-plugins/2-plugins.sh # Acumos plugins and dependencies installation & configurationNOTE: In Flow-1, the z2a environment creation script
z2a/0-kind/0a-env.sh, will have to be executed during the initial setup and again after logging out and logging back into a new session.
The process flow of z2a Flow-1 is depicted in the following diagram.
NOTE: z2a (Flow-1) should not be used as a production environment deployment tool at this time. z2a (Flow-1) has been primarily designed for development and/or test environment installations. Currently, a key component of z2a (Flow-1), kind - Kubernetes in Docker - is not recommended for production installation or production workloads.
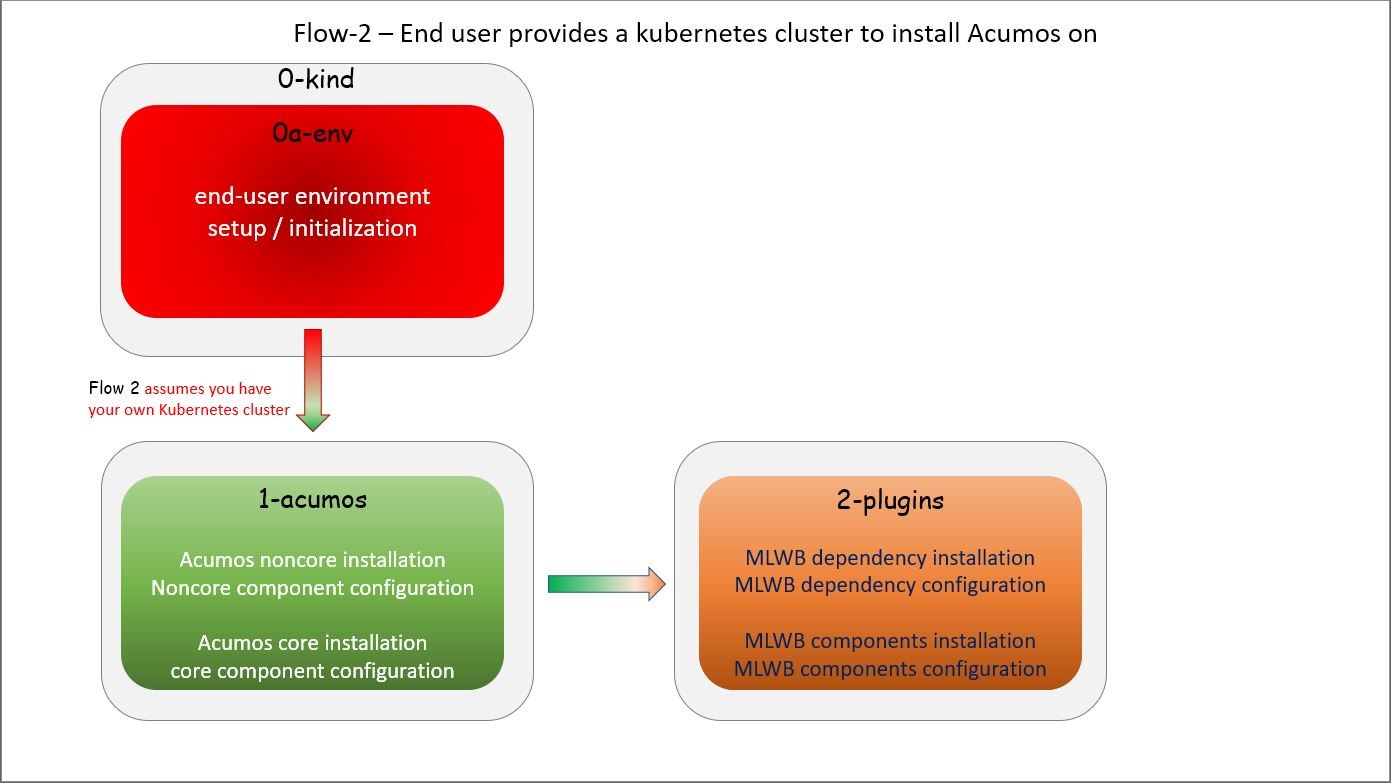
What is z2a Flow-2?
z2a Flow-2 performs an Acumos installation including:
- end-user environment creation;
- z2a dependency installation; and,
- deployment of Acumos noncore and core components on an existing Kubernetes cluster.
The second process flow is a new z2a process flow targeting a pre-built Kubernetes cluster environments (i.e. BYOC - Bring Your Own Cluster).
Flow-2 Components
Flow-2 consists of three (3) steps using the following scripts (and descriptions):
- Step 0
z2a/0-kind/0a-env.sh # z2a environment creation
- Step 1
z2a/1-acumos/1-acumos.sh # Acumos noncore and core component installation & configuration
- Step 2 (optional)
z2a/2-plugins/2-plugins.sh # Acumos plugins and dependencies installation & configuration
The process flow of z2a Flow-2 is depicted in the following diagram.
Guide to z2a Deployment
z2a Requirements
- A SSH client with port-forward/tunnel/proxy capabilities; such as:
- PuTTY (Windows SSH client)
- SecureCRT (MacOS SSH client)
- OpenSSH (Linux SSH client)
Flow-1 Requirements
- A Virtual Machine (VM) which will be used as the host for the Kubernetes
cluster and the Acumos installation
- The user must have sudo rights on the VM
(i.e. must exist in the
/etc/sudoersfile). - The VM requires Internet access such that OS updates, OS supplemental packages and Helm chart installations can be performed. Either the VM has proxied access to the Internet or the user must be able to configure the proxy setting for the VM (if required).
- The user must have sudo rights on the VM
(i.e. must exist in the
Flow-2 Requirements
- A Virtual Machine (VM) which will be used as the installation launch point
for z2a (command & control VM)
- The user must have sudo rights on the VM
(i.e. must exist in the
/etc/sudoersfile). - The VM requires Internet access such that OS updates, OS supplemental packages and Helm chart installations can be performed. Either the VM has proxied access to the Internet or the user must be able to configure the proxy setting for the VM (if required).
- The user must have sudo rights on the VM
(i.e. must exist in the
- A Kubernetes (k8s) cluster
Proxy Requirements
NOTE: z2a assumes that the VM has Internet access (with no proxies present).
NOTE: Internet proxy configurations are beyond the scope of the installation documentation.
Please consult the README-PROXY document for details on the various items that will require configuration and links to resources that will assist in the configuration tasks.
Misc. Requirements
- z2a requires that the following tools be installed on the VM noted above
for Flow-1 or Flow-2 prior to execution of the z2a scripts:
- git (the distributed source code management tool)
- jq (the JSON file processing tool)
Assumptions
It is assumed that the user who is performing this installation:
- is familiar with Linux (i.e. directory creation, shell script execution, editing files using Linux editors, reading log files etc.)
- has sudo access (elevated privileges) to the VM where the installation will occur (Flow-1)
- has sudo access (elevated privileges) to the VM where the installation onto the k8s cluster will occur (Flow-2)
Getting Started
NOTE: z2a depends on being able to reach a number of up-to-date software repositories. All efforts have been made to not bypass distribution-specific package managers and software update facilities.
Installation Location Creation (Flow-1 and Flow-2)
In the following section, the user will perform the following actions:
- Login to the Linux VM where the install will occur
- Install the ‘git’ distributed version-control tool, and the ‘jq’ JSON file processing tool.
- Create a new directory that will be used to perform this installation (i.e. src)
- Change directory into this new directory
- Clone the gerrit.acumos.org system-integration repository into the new directory
- Change directory into the newly created system-integration directory
After completing Step #1 above (log into the VM), here are the commands to execute steps 2-6 above.
# Install 'git' distributed version-control tool
# Install 'jq' JSON file processing tool
# For RPM-based distributions such as RHEL/CentOS, execute the following command:
$ sudo yum install -y git jq
# For Debian-based distributions such as Ubuntu, execute the following command:
$ sudo apt-get install --no-install-recommends -y git jq
$ mkdir -p $HOME/src
$ cd $HOME/src
$ git clone https://gerrit.acumos.org/r/system-integration
$ cd $HOME/src/system-integration
Next, we will inspect the contents of the directory structure that was just
created by the git clone command above.
$ ls -l
total 20
drwxr-xr-x. 16 userID groupID 4096 Mar 19 13:30 AIO
drwxr-xr-x.  3 userID groupID   19 Mar 19 13:30 acumosk8s-public-cloud
drwxr-xr-x.  9 userID groupID  117 Mar 19 13:30 charts
drwxr-xr-x.  4 userID groupID  107 Mar 19 13:30 docs
drwxr-xr-x.  5 userID groupID   87 Mar 20 11:03 helm-charts
drwxr-xr-x.  2 userID groupID  196 Mar 19 13:30 tests
drwxr-xr-x.  4 userID groupID 4096 Mar 19 13:30 tools
drwxr-xr-x.  5 userID groupID  235 Mar 20 18:35 z2a
-rw-r--r--.  1 userID groupID 1281 Mar 19 13:30 INFO.yaml
-rw-r--r--.  1 userID groupID  770 Mar 19 13:30 LICENSE.txt
-rw-r--r--.  1 userID groupID 1388 Mar 19 13:30 README.md
In the directory listing shown above, two (2) directories are of special interest:
helm_chartsis the location of the Acumos core Helm charts used in this installation processz2ais the location of the z2a scripts and supporting utilities. We will refer to that directory as the Z2A_BASE directory. This directory also contains installation scripts for some of the Acumos noncore dependencies and Acumos plugins.NOTE: Please refer to the Troubleshooting section of the HOW TO document for a complete listing of the log files created by z2a and their location.
See: https://docs.acumos.org/en/latest/submodules/system-integration/docs/z2a/how-to.html#troubleshooting
Using the example global_value.yaml file
z2a includes example global_value.yaml files for Acumos in the
$ACUMOS_HOME/z2a/dev1 directory. These example Acumos values files are
provided for both illustrative purposes and to assist in performing a quick
installation (see: TL;DR document).
NOTE: There are two (2) example files in the
$ACUMOS_HOME/z2a/dev1directory.
$ACUMOS_HOME/z2a/dev1/global_value.yaml.dev1     # acumos-dev1 namespace
$ACUMOS_HOME/z2a/dev1/global_value.yaml.z2a-test   # z2a-test namespace
The example Acumos values files can be used for a test installation and additional edits should not be required.
The commands to use the Acumos global_value.yaml.dev1 example value file are:
$ ACUMOS_HOME=$HOME/src/system-integration
$ cp $ACUMOS_HOME/z2a/dev1/global_value.yaml.dev1 $ACUMOS_HOME/z2a/helm-charts/global_value.yaml

NOTE: The Acumos example values can be used for a private development
environment that is non-shared, non-production and not exposed to the
Internet.  The values provided in the Acumos example file are for
demonstration purposes only.
Editing the global_value.yaml file
The global_value.yaml file is located in the ACUMOS_$HOME/helm_charts
directory. We will need to change directories into that location to perform
the necessary edits required for the Acumos installation or use the examples
values noted above.
Before starting to edit the global_value.yaml file, create a copy of the
original file just in case you need to refer to the original or to recreate
the file.
Here are the commands to execute to accomplish the next tasks.
$ cd $ACUMOS_HOME/helm-charts
$ cp global_value.yaml global_value.orig
The default global_value.yaml file requires the user to make edits to the
masked values in the file. Masked values are denoted by six (6) ‘x’ as shown:
“xxxxxx”
All entries with the masked values must be changed to values that will be used
during the installation process. Below is an example edit of a snippet of the
global_value.yaml file, where the values for namespace and clusterName
are edited.
Using your editor of choice (vi, nano, pico etc.) please open the
global_value.yaml file such that we can edit it’s contents.
Before edit (these are examples - please substitute values that are appropriate for your environment):
global:
  appVersion: "1.0.0"
  namespace: "xxxxxx"
  clusterName: "xxxxxx"
After edit: (Example 1)
global:
  appVersion: "1.0.0"
  namespace: "acumos-dev1"
  clusterName: "kind-acumos"
After edit: (Example 2)
global:
  appVersion: "1.0.0"
  namespace: "z2a-test"
  clusterName: "kind-acumos"

NOTE: For entries in the ``global_value.conf`` file that have an existing
entry, do not edit these values as they are essential for correct
installation.
Flow-1 Installation Process
To perform an installation of Acumos, we will need to perform the following steps:
1. Set the ACUMOS_HOME environment variable, change directory into the z2a/0-kind
directory, and execute the z2a/0-kind/0a-env.sh script.
$ ACUMOS_HOME=$HOME/src/system-integration
$ cd $ACUMOS_HOME/z2a/0-kind
$ ./0a-env.sh
2. After successful execution of the 0a-env.sh script, execute the z2a
0b-depends.sh script.
$ ./0b-depends.sh
3. Once the z2a 0b-depends.sh has completed, please log out of your session
and log back in. This step is required such that you (the installer) are
added to the docker group, which is required in the next step.
$ logout
4. Once you are logged back into the VM, set the ACUMOS_HOME environment variable, change directory into the z2a/0-kind directory and execute the z2a 0a-env.sh script and then the 0a-cluster.sh script.
$ ACUMOS_HOME=$HOME/src/system-integration
$ cd $ACUMOS_HOME/z2a/0-kind
$ ./0a-env.sh
$ ./0c-cluster.sh
5. After the z2a z2a/0-kind/0c-cluster.sh script has completed, we will
need to check the status of the newly created Kubernetes pods before we proceed
with the Acumos installation. We can ensure that all necessary Kubernetes pods
are running by executing this kubectl command.
$ kubectl get pods -A
6. When all Kubernetes pods are in a Running state, we can proceed and
execute the 1-kind.sh script to install and configure Acumos.
$ cd $ACUMOS_HOME/z2a/1-acumos
$ ./1-acumos.sh
7. The last step is to check the status of the Kubernetes pods create during the Acumos installation process.
$ kubectl get pods -A
When all Kubernetes pods are in a Running state, the installation of the
Acumos noncore and core components has been completed.
Flow-2 Installation Process
To perform an installation of Acumos using the Flow-2 technique, we will need to perform the following steps:
NOTE: Theglobal_value.yamlfile must be edited to provide the correct clusterName and namespace. Please refer to the previous section on performing the edits to theglobal_value.yamlfile.
1. Set the ACUMOS_HOME environment variable, change directory into the z2a/0-kind
directory, and execute the z2a/0-kind/0a-env.sh script.
$ ACUMOS_HOME=$HOME/src/system-integration
$ cd $ACUMOS_HOME/z2a/0-kind
$ ./0a-env.sh
2. After successful execution of the z2a/0-kind/0a-env.sh script, execute
the z2a/1-acumos/1-kind.sh script to install and configure Acumos.
$ cd $ACUMOS_HOME/z2a/1-acumos
$ ./1-acumos.sh
3. The last step is to check the status of the Kubernetes pods create during the Acumos installation process.
$ kubectl get pods -A
When all Kubernetes pods are in a Running state, the installation of the
Acumos noncore and core components has been completed.
Acumos Plugin Installation
MLWB
Machine Learning WorkBench is installed during the 2-plugins steps of the
installation process discussed in this document. Below are details of the
installation process.
Editing the mlwb_value.yaml File
NOTE: z2a includes an example value file for MLWB in the$HOME/src/system-integration/z2a/dev1directory. The MLWB example values file is provided for both illustrative purposes and to assist in performing a quick installation. The example MLWB values file from that directory could be used here and these edits are not required.
The commands to use the MLWB example values are:
$ ACUMOS_HOME=$HOME/src/system-integration
$ cp $ACUMOS_HOME/z2a/dev1/mlwb_value.yaml.mlwb $ACUMOS_HOME/helm-charts/mlwb_value.yaml
The MLWB example values can be used for a private development environment that is non-shared, non-production and not exposed to the Internet. The values in the MLWB example file are for demonstration purposes only.
The mlwb_value.yaml file is located in the
$HOME/src/system-integration/helm_charts directory. We will need to change
directories into that location to perform the edits necessary to perform the
installation.
Before starting to edit the mlwb_value.yaml file, create a copy of the original
file just in case you need to refer to the original or to recreate the file.
Here are the commands to execute to accomplish the next tasks.
$ cd $ACUMOS_HOME/helm-charts
$ cp mlwb_value.yaml mlwb_value.orig
The default mlwb_value.yaml file requires the user to make edits to the
masked values in the file. Masked values are denoted by six (6) ‘x’ as shown:
“xxxxxx”
Using your editor of choice (vi, nano, pico etc.) please open the
mlwb_value.yaml file such that we can edit it’s contents.
CouchDB - the following CouchDB values need to be populated in the
mlwb_value.yaml file before installation of the MLWB CouchDB dependency.
# CouchDB
acumosCouchDB:
  createdb: "true"
  dbname: "xxxxxx"
  host: "xxxxxx"
  port: "5984"
  protocol: "http"
  pwd: "xxxxxx"
  user: "xxxxxx"
JupyterHub - the following JupyterHub values need to be populated in the
mlwb_value.yaml file before installation of the MLWB JupyterHub dependency.
# JupyterHub
acumosJupyterHub:
  installcert: "false"
  storepass: "xxxxxx"
  token: "xxxxxx"
  url: "xxxxxx"
acumosJupyterNotebook:
  url: "xxxxxx"
NiFi - the following NiFi values need to be populated in the
mlwb_value.yaml file before installation of the MLWB NiFi dependency.
# NIFI
acumosNifi:
  adminuser: "xxxxxx"
  createpod: "false"
  namespace: "default"
  registryname: "xxxxxx"
  registryurl: "xxxxxx"
  serviceurl: "xxxxxx"
MLWB Installation
To perform an installation of MLWB, we will need to perform the following steps:
- set the ACUMOS_HOME environment variable
- Change directory into the
z2a/2-pluginsdirectory - Execute the
2-plugins.shscript which install the MLWB dependencies and the MLWB components
$ ACUMOS_HOME=$HOME/src/system-integration
$ cd $ACUMOS_HOME/z2a/2-plugins
$ ./2-plugins.sh
Addendum
Additional Documentation
Below are links to supplementary sources of information.
Kind: https://kind.sigs.k8s.io/
For post-installation Machine Learning WorkBench configuration steps, please see the MLWB section of the CONFIGURATION document.
| Created: | 2020/07/13 |
|---|---|
| Last Modified: | 2020/08/26 |