7. Federation
Federation enables peering of Acumos sites for the purpose of developing a broader public marketplace of models. Federation involves several main processes described in the following sections:
- Establishing connectivity between peers
- Creating peer relationships between portals
- Subscribing to models published in the public marketplace of peers
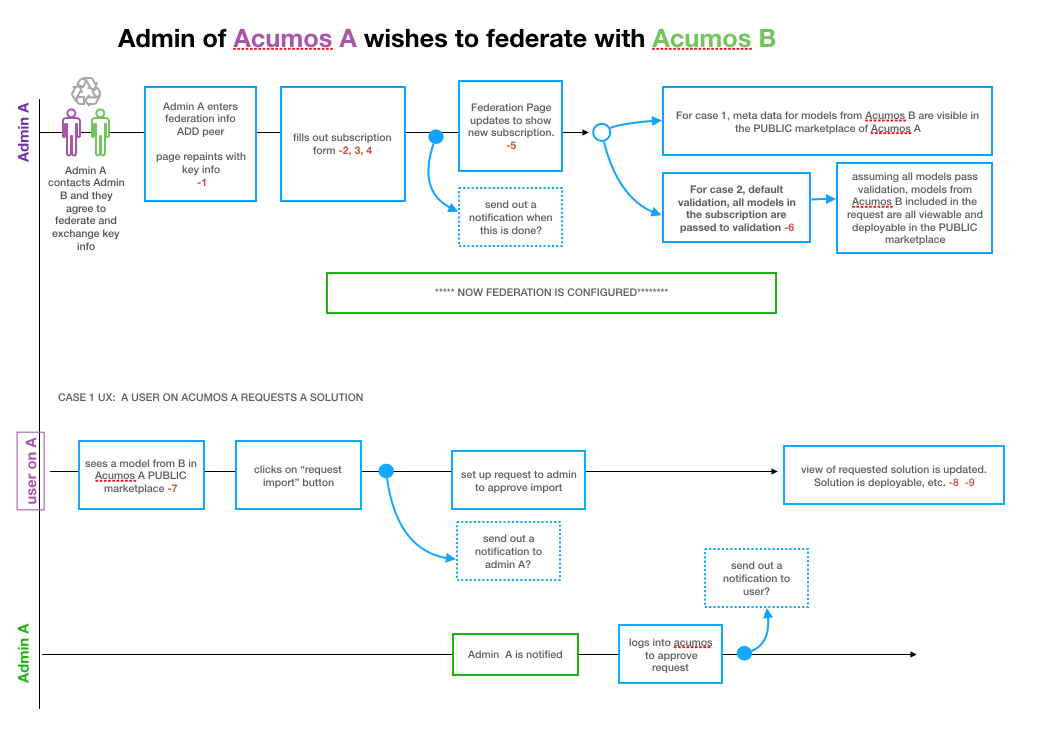
Following is an overview of the federation process.
Once connectivity has established between peers, and a peer relationship established in the admin UI (step 1 below), the local admin can setup a public marketplace subscription to some set of models from the peer (steps 2-4 below) and receive confirmation that the subscription is setup (step 5 below). An optional step at this point is the validation of the models received over the federation API, prior to insertion of their metadata (not the actual model artifacts) into the local portal’s public marketplace.
A user of the local portal can then discover new models and request access to them, which may need to be approved by a local admin, per the local admin’s customization of the related workflow. Once approved, the model artifacts are retrieved and stored in local repositories, and made available for the user to download, launch, etc.
The federation process is outlined below:
7.1. Configuring an Acumos Instance for Federation
Instructions are in the ../../../submodules/federation/docs/config.
7.2. Establishing connectivity between peers
Peer relationships are initiated and negotiated by peer companies/organizations through processes outside the scope of this guide, and may depend upon network provisioning also outside the scope of this guide. Once peering has been agreed to, the following steps are required as prerequisites to the use of the portal UI for setting up federation:
- Since portals and related public APIs are accessed only over HTTPS,
each portal must have at least one SSL certificate to use for the
following publicly exposed services and API endpoints, or one
certificate for each:
- Portal web service and onboarding API endpoint, both accessed through an HTTPS proxy setup as part of portal deployment. Further description of these aspects are provided in *(TODO: link to portal deployment guide)*
- The federation API endpoint
- Each peer shares their public certificate or certificate authority
(CA) details for the federation API endpoint, and the other peer
installs the CA certificate by:
- On the host of the federation-gateway service, importing the CA cert into the SSL truststore as setup for federation-gateway.
- restarting their federation-gateway service, and verifying basic connectivity to the peer gateway.
7.3. Creating peer relationships between portals
7.3.1. Enable Federation
The first step in creating peer relationships to enable federation overall, but clicking the slider on the upper-right of the Federation tab, labeled as “Federation”. By default, this shows as “Disabled”, and when clicked will change to “Enabled”. *TODO: clarify the effect that enabling or disabling federation has on the following processes*
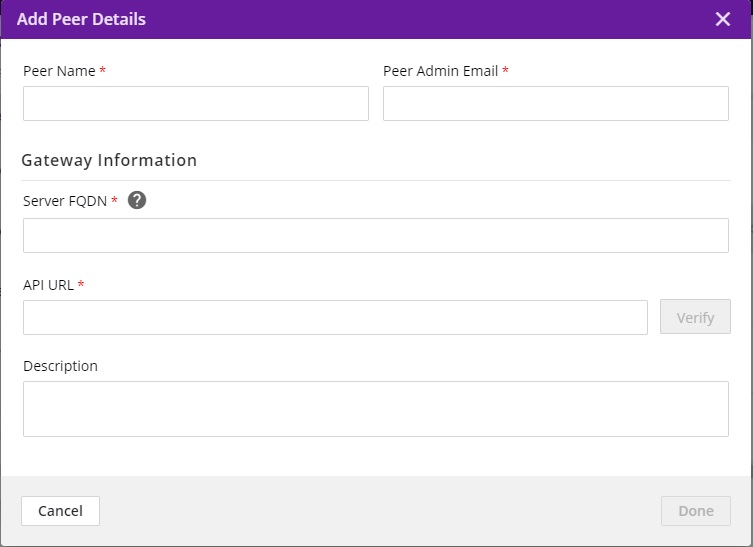
7.3.2. Add Peer
Selecting the “Add Peer” button will present a dialog in which a peer relationship can be defined and validated, with the options:
Peer Name (mandatory): name to assign this peer in the peer list. *TODO: clarify any syntax/semantic restrictions/implications*
Peer Admin Email (mandatory): must be a valid format email address, and not already used for some other peer
Server FQDN (mandatory): Domain name associated with a valid server certificate as signed by the peer CA as described above. The domain name must be resolvable via DNS, or by local host configuration (for an example of the latter, see the OnClick Deploy guide) *(TODO: link to guide)*
API Url (mandatory): URL for the peer federation API endpoint. Must be of the form “https:<FQDN or IP address>:<port configured for the federation API>”.
Description (optional): Anything that helps describe this peer.
7.4. Actions on peer list entries
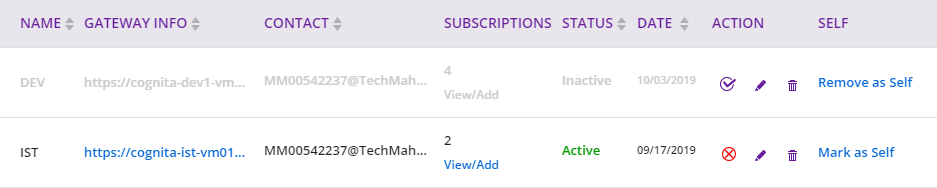
Once a peer has been added, it is displayed in the list of peers. The list provides various information and actions for peer entries:
Name, gateway info, contact: as entered in the “Add Peer” dialog
Subscriptions: manage subscriptions (see section below)
Status: “inactive” when the peer is added; “active” once the “Activate” icon (
 ) is clicked. Goes back to “inactive” when
the “Deactivate” icon (
) is clicked. Goes back to “inactive” when
the “Deactivate” icon ( ) is clicked. *TODO: clarify effects
of activation/deactivation*
) is clicked. *TODO: clarify effects
of activation/deactivation*Status change icon: “Activate” icon (
) when added or
inactive, or “Deactivate” icon (Deactivate|) when active.Edit (
 ): edit peer details (see section below)
Delete (
 ): removes the peer entry
Self: identifies whether the peer entry is for the local portal as selected when the peer was added. “Mark as Self” when added or currently not set to self. “Remove as Self” when set to self. Clicking the current setting will toggle to the other value.
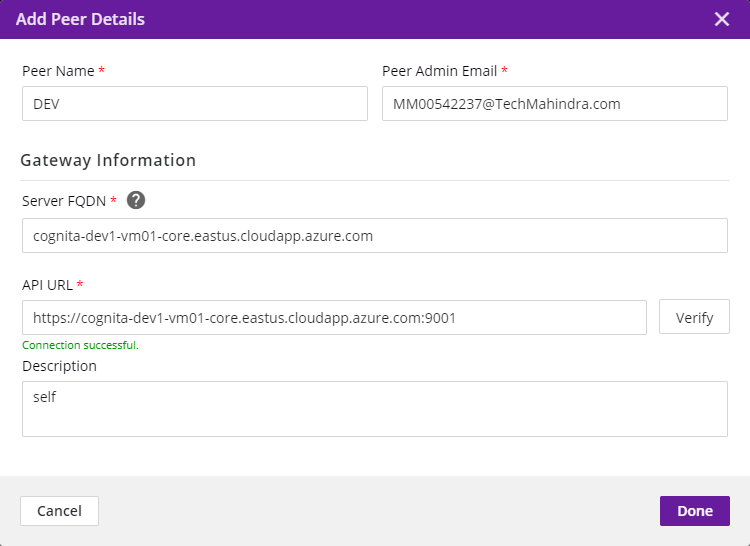
7.5. Edit Peer
Selecting the “Edit Peer” icon () will bring up the same dialog
as “Add Peer” with the addition of the “Verify” button being selectable.
Selecting the “Verify” button will:
*TODO: clarify what the verify does, affects, and any subsequent actions once a verification process is successful/unsuccessful*
7.6. Subscriptions
Selecting “View/Add” in the “Subscriptions” column will bring up a dialog for management of subscriptions with the peer. When first added, the peer subscriptions list will be empty.
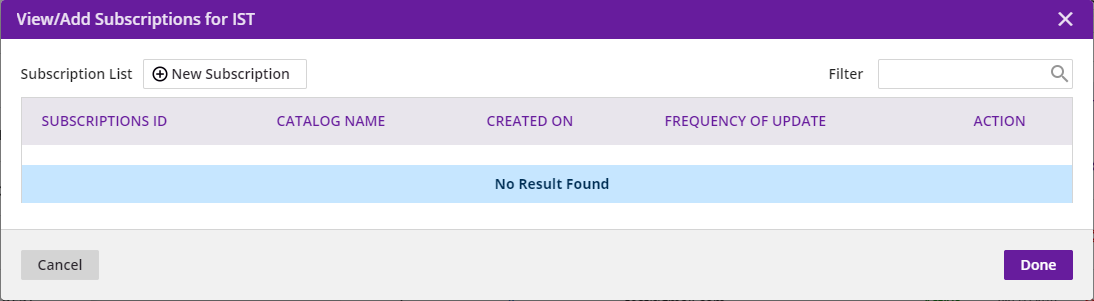
7.6.1. Add Subscription
Selecting “New Subscription” in the “View/Add Subscriptions” dialog will display:
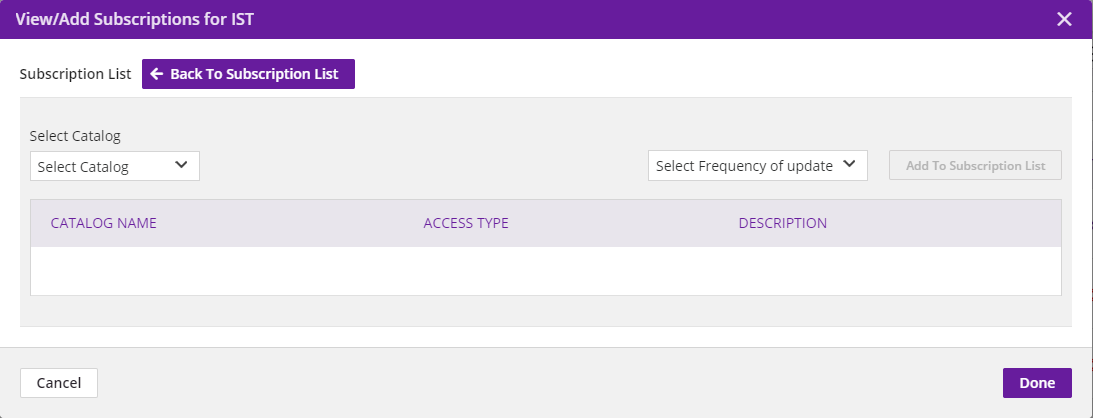
Select the catalog from the “Select Catalog” drop-down. Select frequency of update form “Select Frequency of update drop down (Hourly, Daily, Monthly, Update on demand). Then click on “Add To Subscription List” button the subscription will be added to the list for this peer, e.g. as below.

To see the details for a subscription, select the “+” icon, which will expand the display with details and options, e.g. as below. From here you can:
- Select a new “Frequency of Update”
- Delete the subscription by selecting the trashcan icon (image18)