System Integration User Guide
Acumos API Management with Kong
According to the Kong website, Kong is a scalable, open source API Layer/Gateway/Middleware. The Acumos Platform uses Kong as a reverse proxy server. SSL certificates are installed on the Kong server so each containerized app doesn’t have to install its own certs. Kong is highly configurable. Browse the Kong documentation for a detailed description and user guides.
Kong API helps in reducing the rewriting of the same piece of code again and again for SSL certificates configuration in order to make the API secure. Now we don’t need to do any coding/configuration work in API anymore.
Backend Architecture
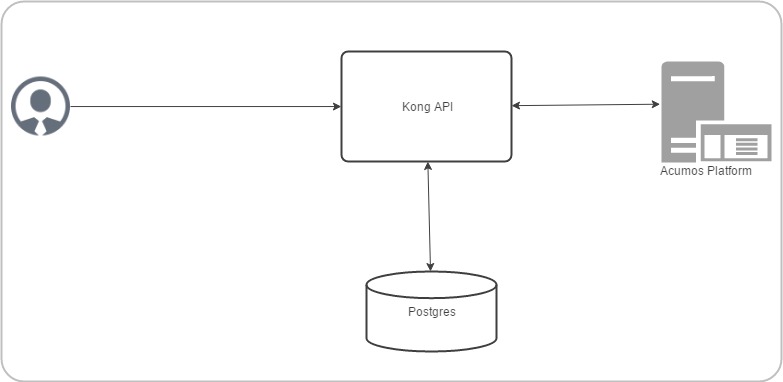
Note: All the configuration data sent through the Admin API is stored in Kong’s data store. Kong is capable of supporting both Postgres and Cassandra as storage backend. We have chosen Postgres.
Kong API component versions
- postgres:9.4
- kong:0.11.0
Acumos Kong API setup
Kong API completely containerized solution is automated with docker compose. It installed with its own docker-compose file.
In dockers-compose definition, there are three services:
- kong-database
- kong-migration
- kong
Kong uses an external datastore to store its configuration such as registered APIs, Consumers and Plugins. The entire configuration data is stored in Kong’s data store. The kong-migration service is used to create the objects in the kong-database. This bootstrap functionality is not provided by kong service, so kong-migration service run once inside the container.
By default Kong listens on the following ports:
:8000 on which Kong listens for incoming HTTP traffic from your clients, and forwards it to your upstream services.
:8443 on which Kong listens for incoming HTTPS traffic. This port has a similar behavior as the :8000 port, except that it expects HTTPS traffic only. This port can be disabled via the configuration file.
:8001 on which the Admin API used to configure Kong listens.
:8444 on which the Admin API listens for HTTPS traffic.
Acumos Kong is running on port
:7000 on which Acumos Kong listens for incoming HTTP traffic from your clients, and forwards it to your upstream services.
:443 on which Acumos Kong listens for incoming HTTPS traffic. This port has a similar behavior as the :7000 port, except that it expects HTTPS traffic only. This port can be disabled via the configuration file.
:7001 on which the Admin API used to configure Acumos Kong listens.
:7004 on which the Admin API listens for HTTPS traffic.
Note: Acumos Kong API docker-compose.yml and shell script can be run before or after the main docker-compose. Ensure before access the service URL via acumos Kong API all the services which we are going to access should be up and running.
Prerequisites
Docker and Docker Compose installed
Steps
- Clone the system-integration repository
$ git clone https://gerrit.acumos.org/r/system-integration
- Builds, (re)creates, starts, and attaches to containers for kong, postgres.
$ ./docker-compose-kong.sh up -d
- To stop the running containers without removing them
$ ./docker-compose-kong.sh stop
Steps to create self signed in certificate
- Create the private server key
openssl genrsa -des3 -out server.key 2048
- Now we create a certificate signing request
openssl req -new -key server.key -out server.csr -sha256
- Remove the passphrase
cp server.key server.key.org
openssl rsa -in server.key.org -out server.key
- Signing the SSL certificate
openssl x509 -req -in server.csr -signkey server.key -out server.crt -sha256
Acumos API configuration
Please update the configuration settings in “secure-acumos-api.sh” script to match your environment:
- Copy your host certificate and key under acumos-kong-api “certs” directory
- Change the values of placeholders below before running the script
export ACUMOS_KONG_CERTIFICATE_PATH=./certs

export ACUMOS_CRT=localhost.csr

export ACUMOS_KEY=localhost.key

export ACUMOS_HOST_NAME=<your hostname>

export ACUMOS_HOME_PAGE_PORT=8085

export ACUMOS_CCDS_PORT=8003

export ACUMOS_ONBOARDING_PORT=8090
Run the “secure-acumos-api.sh” script, Please ensure that Acumos Kong API container is up.
./secure-acumos-api.sh
Expose new service:
Use the Admin API port 7001 to configure Kong. Acumos standard sample to expose the service is present in shell script:
./secure-acumos-api.sh
For more details visit Kong Admin API documentation,
Deployment of Acumos platform under Azure-K8s
Introduction
This user guide describes how to deploy Acumos platform using Kubernetes an open-source container-orchestration system for automating deployment, scaling and management of containerized applications under public cloud Azure.
What’s included in the acumosk8s public cloud Azure
In system-integration repo folder acumosk8s-public-cloud/azure:
- deployments/all_start_stop.sh: the main script that kicks off the deployment, to setup pods Acumos , elk, docker, kong, nexus ,proxy and mariadb under a kubernetes environment.
- acumos-kubectl.env: environment setup file that is customized as new environment parameters get generated (e.g. passwords). Used by various scripts in this toolset, to set shell environment variables that they need.
- deployments/: kubernetes deployment templates for all system components.
- services/all_start_stop.sh: the script that gets all the services started, to setup service for Acumos , elk, docker, kong, nexus ,proxy, mariadb and federation under a kubernetes environment.
- services/: kubernetes service templates for all system components.
- configmap/: kubernetes configmap templates for ELK stack.
- volumeclaim/all_start_stop.sh: the script that creates persistent volume claim for mariadb, nexus ,output, web onboarding, federation certificates and acumos logs.
Release Scope
Current Release (Athena)
The Athena release includes these capabilities that have been implemented/tested:
- Multi-Node deployment of the Acumos platform under kubernetes.
- deployment with a new Acumos database or redeployment with a current database and components compatible with that database version.
- Component services under kubernetes as named below (deployed as
one pod-based service k.a acumos):
- core components of the Acumos platform
- Portal Marketplace: acumos
- Hippo CMS: acumos
- Solution Onboarding: acumos
- Design Studio Composition Engine: acumos
- Federation Gateway: federation-service
- Azure Client: acumos
- Common Data Service: acumos
- Filebeat: acumos
- Elasticsearch: elasticsearch
- Logstash: logstash-service
- Kibana: kibana-service
- external/dependency components
- docker engine/API: acumos-docker-service under kubernetes.
- MariaDB: mariadb running as acumos-mysql service under kubernetes.
- Kong proxy: running as acumos-kong-proxy , acumos-postgres service under kubernetes.
- Nexus: running as acumos-nexus-service under kubernetes.
- Proxy: running as acumos-proxy under kubernetes.
- core components of the Acumos platform
Future Releases
Future releases may include these new features:
- Scaling up, monitoring health tool.
Prerequisites
Setup of Kubernetes cluster in Azure and kubectl, the Kubernetes command-line client.
Step-by-Step Guide
- Clone the system-integration repository.
$ git clone https://gerrit.acumos.org/r/system-integration
- Change directory to acumosk8s-public-cloud/azure
$ cd acumosk8s-public-cloud/azure
- Edit acumos-kubectl.env file to make changes related to latest assembly , database connection , credentials ,etc.
$ vi acumos-kubectl.env
- Use kubectl create command on kubernetes client machine to create a namespace.
$ kubectl create namespace <namespace name>
Example: kubectl create namespace acumos-ns01
- Change directory to acumosk8s-public-cloud/azure/volumeclaim to create persistent volume claim (pvc).
$ cd acumosk8s-public-cloud/azure/volumeclaim
- Edit acumos-volumeclaim.sh file and update variable ENV_FILE for absolute path of acumos-kubectl.env file.
$ vi acumos-volumeclaim.sh
- Run all-start-stop.sh script under volumeclaim directory. This will create pvc for certs , nexus, output, acumos logs ,webonboarding and mariadb.
$ ./all-start-stop.sh create
- This step needs to be executed only if all the pvc created earlier needs to be deleted.This will delete all the pvc created under the given namespace.
$ ./all-start-stop.sh delete
- If each volumeclaim need to be created individually then skip step 7 and use below command.
$ ./acumos-volumeclaim.sh <name of volumeclaim .yaml file> create
Example: ./acumos-volumeclaim.sh acumos-volumeclaim.yaml create
- Create a secret file for acumos that contains base64 encoding to pull docker image from nexus repo.
$ log "Create k8s secret for docker image pulling from nexus repo"
  b64=$(cat ~/.docker/config.json | base64 -w 0)
  cat <<EOF >acumos-secret.yaml
  apiVersion: v1
  kind: Secret
  metadata:
    name: acumos-secret
    namespace: acumos-ns01
  data:
    .dockerconfigjson: $b64
  type: kubernetes.io/dockerconfigjson
  EOF
- Create configmap for ELK stack.
$ cd  acumosk8s-public-cloud/azure/configmap
$ ./acumos-configmap.sh <name of config.yaml file> create
Example: ./acumos-configmap.sh es-config.yaml create
      ./acumos-configmap.sh logstash-config.yaml create
- Change directory to acumosk8s-public-cloud/azure/deployments
$ cd acumosk8s-public-cloud/azure/deployments
- Edit acumos-deployment.sh file and update variable ENV_FILE for absolute path of acumos-kubectl.env file.
$ vi acumos-deployment.sh
- Run all-start-stop.sh script under deployments directory. This will create kubernetes deployment for mariadb ,kong, elk, acumos (containing all components), nexus, docker and proxy.
$ ./all-start-stop.sh create
- This step needs to be executed only if all the deployment.yaml created earlier needs to be deleted.This will delete kubernetes deployment for mariadb ,kong, elk, acumos (containing all components), nexus, docker and proxy created under the given namespace.
$ ./all-start-stop.sh delete
- If each deployment need to be created individually then skip step 14 and use below command.
$ ./acumos-deployment.sh <name of deployment.yaml file> create
Example: ./acumos-deployment.sh acumos-deployment.yaml create
- Change directory to acumosk8s-public-cloud/azure/services
$ cd acumosk8s-public-cloud/azure/services
- Edit acumos-service.sh file and update variable ENV_FILE for absolute path of acumos-kubectl.env file.
$ vi acumos-service.sh
- Run all-start-stop.sh script under services directory. This will create kubernetes service for mariadb ,kong, elk, acumos (containing all components), nexus, docker ,federation and proxy. After services are up and running we need to map external endpoints generated for kibana-service , federation-service and acumos-nexus-service to FQDN in azure e.g. IP 40.117.115.236 generated for kibana is mapped to acumosk8s-log.eastus.cloudapp.azure.com
$ ./all-start-stop.sh create
- This step needs to be executed only if all the services.yaml created earlier needs to be deleted.This will delete kubernetes services for mariadb ,kong, elk, acumos (containing all components), nexus, docker , federation and proxy created under the given namespace.
$ ./all-start-stop.sh delete
- If each service need to be created individually then skip step 19 and use below command.
$ ./acumos-service.sh <name of service.yaml file> create
Example: ./acumos-service.sh acumos-service.yaml create
- Create a certs directory in kubernetes client machine and generate files acumos-k8s.cert , acumos-k8s.key , acumos-k8s.pkcs12 and acumosTrustStore.jks
- Create certificate and run ./create-certs.sh , this shell file includes below line
openssl req -x509 -newkey rsa:4096 -keyout acumos-k8s.key -out acumos-k8s.cert -days 365
- Install certificates and run ./install-certificates.sh that includes below line. acumosk8s.eastus.cloudapp.azure.com is the FQDN and 8001 is port no that is exposed.
curl -i -X POST http://acumosk8s.eastus.cloudapp.azure.com:8001/certificates \
-F "cert=acumos-k8s.cert" \
-F "key=acumos-k8s.key" \
-F "snis=acumosk8s.eastus.cloudapp.azure.com,localhost"
- Add to certificates run ./add-to-cacert.sh , this shell file includes below line.
/usr/lib/jvm/java-8-oracle/bin/keytool -import -noprompt -keystore acumosTrustStore.jks -storepass changeit -alias acumos-k8s -file acumos-k8s.pem
- Generate pkcs12.sh file run ./generate-pkcs12.sh , this file includes below code.
#! /bin/bash
CERT_DIR=/path-to-directory/acumos-k8s/certs
CERT_FILE=acumos-k8s.cert
CERT_KEY=acumos-k8s.key
PKCS12_FILE=acumos-k8s.pkcs12
openssl pkcs12 -export -nokeys -in ${CERT_DIR}/${CERT_FILE} -out ${CERT_DIR}/${PKCS12_FILE}
- Give complete access to .pkcs12 and .jks file by making use of below command
chmod 777 acumosTrustStore.jks
chmod 777 acumos-k8s.pkcs12
28. Copy acumosTrustStore.jks and acumos-k8s.pkcs12 to volume mounted for federation gateway container. Make use of below commands. In our case /path-to-directory/acumos-k8s/certs/acumos-k8s.pkcs12 is the path where file is located under K8 , acumos-ns01 is the namespace created and acumos-1353575208-c235g is the pod name that contains all the containers including federation-gateway. /app/certs is the mount directory for federation-gateway container
kubectl cp /path-to-directory/acumos-k8s/certs/acumos-k8s.pkcs12 acumos-ns01/acumos-1353575208-c235g:/app/certs/ -c federation-gateway

kubectl cp /path-to-directory/acumos-k8s/certs/acumosTrustStore.jks acumos-ns01/acumos-1353575208-c235g:/app/certs/ -c federation-gateway
- After copying .pkcs12 and .jks file restart the federation-gateway pod
- Run secure-acumos-api-internal.sh file on K8. You need to change few configuration listed below based on your environment in this file
export ACUMOS_KONG_API_HOST_NAME=acumosk8s.eastus.cloudapp.azure.com

export ACUMOS_KONG_API_HOST_SNIS=acumosk8s.eastus.cloudapp.azure.com

export ACUMOS_KONG_API_PORT=8001

export ACUMOS_KONG_CERTIFICATE_PATH=/path-to-directory/acumos-k8s/certs

export ACUMOS_CRT=acumos-k8s.cert

export ACUMOS_KEY=acumos-k8s.key

export ACUMOS_HOST_NAME=acumos.acumos-ns01

export ACUMOS_NEXUS_HOST_NAME=acumos-nexus-service.acumos-ns01

export ACUMOS_HOME_PAGE_PORT=8085

export ACUMOS_ONBOARDING_PORT=8090

export ACUMOS_CMS_PORT=9080

export ACUMOS_NEXUS_PORT=8001
- Follow below steps to set up CMS.
- Login to the Hippo CMS console as “admin/admin”, at http://<hostname>:<ACUMOS_CMS_PORT>/cms/console, where ACUMOS_CMS_PORT is per acumos-kubectl.env; for the default, the address is acumosk8s.eastus.cloudapp.azure.com:9080/cms/console
- On the left, click the + at
hst:hstand then also athst:hosts. Click the + at thedev-enventry, and the same for the nodes as they appear:com, azure, cloudapp, eastus- Right-click on the “acumos-dev1-vm01-core” entry and select “Move node”.
- In the
Move Nodedialog, select thedev-envnode, enter “<hostname>” atTo, and click``OK``. Default hostname is acumosk8s- When the dialog closes, you should see your node renamed and moved under
dev-env. You may also want to save your changes by pressing theWrite changes to repositorybutton in the upper right.- With the “<hostname>” node selected, click
Add Propertyfrom the toolbar.- In the
Add a new Propertydialog, place your cursor in theNamefield and then selecthst:schemeagnostic. clickOK.- Make sure the hostname is selected on the left. Then select the check box under the new attribute. This attribute is essential, as internal to the Acumos platform the Hippo CMS service is accessed via HTTP, but externally, user web browsers access the Acumos portal via HTTPS. Also click the
Write changes to repositorybutton on the upper right.- Delete the superfluous node. Right-click the
comnode, selectDelete node.- Select the
Save immediatelycheck box and clickOK
- Follow below step to set up MariaDB
Run below command to connect to acumos-mysql container.
kubectl -n acumos-ns01 exec -it <acumos-mysql-pod name> /bin/sh
Connect to Mariadb.
mysql -u root -p <password>
Execute below scripts to create acumos and acumos cms database. e.g we have used CDS but it need to be same mentioned in env file.
drop database if exists CDS;
create database CDS;
create user 'CDS_USER'@'localhost' identified by 'CDS_PASS';
grant all on CDS.* to 'CDS_USER'@'localhost';
create user 'CCDS_USER'@'%' identified by 'CDS_PASS';
grant all on CDS.* to 'CDS_USER'@'%';
drop database if exists acumos_CMS;
create database acumos_CMS;
create user 'CMS_USER'@'localhost' identified by 'CMS_PASS';
grant all on acumos_CMS.* to 'CMS_USER'@'localhost';
create user 'CMS_USER'@'%' identified by 'CMS_PASS';
grant all on acumos_CMS.* to 'CMS_USER'@'%';
Execute the DDL and DML scripts for any database version that needs to be configured.